X Rebirth - Руководство моддера
Нижеизложенное может заинтересовать тех, кто хочет занятся моддингом этой игры. Мод, который будет разработан в качестве примера в этом руководстве, доступен
для скачивания, если вдруг вас интересует что-либо из изложенных ниже примернов.
Примечание: Это руководство, мягко говоря, покрывает лишь очень малую часть всего того, что может быть сделано в игре. Я буду добавлять и уточнять содержимое по мере появления свободного времени.
Предисловие
В случае X Rebirth моддинг означает изменение или добавление нового контента в игру. Это руководство в основном фокусируется на работе с xml-файлами для управления различными аспектами игры.
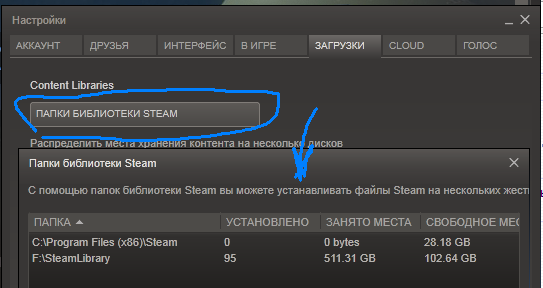
Моды в X:R считаются "расширениями", а содержимое "расширений" должно лежать в папке
\extensions. Доступные расширения будут перечислены в под-меню "Расширения" главного меню где их можно будет включать и выключать по-отдельности.
Возможности модификаций могут варьироваться от простых изменений графических элементов игры (изменение цвета "магистрали", например) до новых элементов вселенной, или написания собственных алгоритмов ИИ или скриптов для миссий.
Создание новых моделей (мешей) для игры не входит в это руководство и будет рассмотренно отдельно.
Модифицирование X Rebirth можно классифицировать по нескольким общим направлениям, включая (но не ограничиваясь) следующий список:
- Материалы и эффекты
- Вселенная (карта)
- Миссии (Mission Director - MD) и скрипты ИИ
- Модели (не входит в это руководство)
Так как в X:R множество файлов, которые могут заинтересовать потенциальных моддеров, вот некоторые важные пути:
\aiscripts - Скрипты управляющие различными деятельностями искуственного интелекта (сражение, движение, добыча материалов и т.п.)
\extensions - Путь к вашим"расширениям (модам)
\index - тут лежат components.xml и macros.xml. Это два важных файла, которые ссылаются на другие файлы и пути
\libraries - Файлы определяющие целое множество различных игровых элементов.
\maps - Карты для галактики, кластеров, магистралей и зон
\md - Файлы миссий на языке MD
\t - Файлы локализаций
Важно:
Объединять или не объединять - вот в чём вопрос. Расширения игры
никогда не должны менять базовые файлы игры. В противном случае будет попросту невозможно совместить два разных мода меняющих некоторые общие файлы. Это означает, что ваши модификации должны содержатся в файлах расщирения и применяются в правильном порядке.
Если ваш мод активен игра проверяет каталог с этим расширением и выясняет, нет ли там файлов лежащих там же (относительно каталога расширения) и названных также, что и основные файлы игры. Когда такое случается - игра находит модифицированный "базовый" файл игры - ей потребуется дополнительная информация для того чтобы понять, что делать с этим файлом.
Обычные XML файлы объединяются на одном уровне ниже корневого узла, так что все такие файлы в расширениях должны содержать
только добавляемые элементы к оригинальным XML файлам.
Однако существует и иной формат файлов для изменения XML-файлов в расширениях - так называемый "формат заплаток" (patch format). Он описывается (индустриальным) стандартом XML Patch и позволяет определить все необходимые модификации оригинального XML файла - добавление, изменение и удаление как любых узлов, так и атрибутов.
Например, довольно частно нужно изменить или целиком заменить некоторый шаблон или макрос своим собственным. Этого можно достичь просто добавлением новой записи в "индекс" с именем нужного макроса и перенаправлением её в нужный шаблон или описание макроса в вашем моде (при чтении файла индекса более поздние записи замещают более ранее с теми же именами. А так как при стандартном объединении сначала идёт огинальное содержимое, а потом содержимое расширений - запись вашего мода переопределит оригинальную, что нам и нужно). После этого вы можете делать практически что угодно с этим шаблоном или макросом - добавлять и
менять свойства, меши и т.п.
Примечание:
Пожалуйста, прочитайте описание компонентной модели и структуры вселенной в приложениях (ссылка coming soon™). Понимание этих базовых вещей очень важно.
Скорее всего вам нужно будет распаковать базовые файлы игры (cat/dat) для того, чтобы лучше понимать какие изменения ваше расширение должно вносить для достижения желаемой цели. Это можно осуществить при помощи EgoSoft'овской утилиты XRCatTool.exe.
Также, чтобы избежать кривотолков, пожалуйста помните, что в этом руководстве слово "Кластер" используется для описания игровой сущности "Система" - потому что именно так ("кластер") эта сущность называется в различных файлах с которыми вам придётся работать как моддеру.
Содержимое:
This guide demonstrates various methods that can be used to modify the game. For the purpose of "learning by doing", this guide is written in the form of a tutorial involving various examples of additions to the Universe map and other alterations.
Part One: Images and Effects
Example 1: Create a mod extension
Example 2: Change a material effect color
Example 3: Create a custom billboard advertisement
Part Two section A: Universe Editing
Example 4: Add a new cluster
Example 5: Add a new Sector
Example 6 Working with zones
Part Two section B: Universe Editing
Example 7: Highways and Super Highways
Example 8: Working with Regions
Example 9. Create a custom cluster background material
Example 10. Create a custom Planet texture material
Part Three: Bringing the Universe to life
Example 11: Working with Jobs (AI spawning)
Example 12: Working with Mission Director
Conclusion
Appendix
Suggested software and reference materials:
1. Visual Studio Express (free) or similar XML Editor.
2. Image Editor such as Photoshop (free CS2 version) with DDS Plug-in or Gimp (plugin here ).
3. 7-Zip File Manager (or other) for extracting core image files
4. Egosoft XRCatTool.exe for extracting core game data files (link soon)
5. Example mod extension developed for this guide (download here)
6. XML Patch document standard RFC 5261.
7. HHD Free Hex Editor (or equiv).
8. Official Mission Director Guide (link soon)
Examples
Part One: Extensions, Images and Effects
Example 1: Create a mod extension
Before we do anything else, we first need to establish a folder location for our mod files.
1. There is a game folder named extensions located off the game root directory. You may need to create this directory if it doesn't already exist.
2. Download the mod file osr_universe.rar containing the examples referred to throughout this guide and extract into the game extensions folder. Your directory structure will look like this:
Code:
X Rebirth
extensions
osr_universe
assets
index
libraries
maps
md
3. Open the content.xml file in the osr_universe directory with your xml editor. Here you will see various text fields for author, description and a few other things related to identifying your mod and providing information displayed in the extensions sub-menu of the game.
4. The most basic mod extension consists of a single mod directory and content.xml. Such a mod wouldn't actually do anything, but it would show in the menu and could be activated and deactivated there.
Example 2: Change a material effect color
Here we will change the default local highway tube color from yellow to blue.
1. Open the file material_library.xml located in extensions\osr_universe\libraries
2. If you have extracted the game data files (using XRCatTool.exe), you can open the core game material_library.xml for comparison with the one included in our example file.
3. In the core game file (not the example file), search for the string "highway_tube" in material_libary.xml. You will see the material definition for the highway tube effect. It looks something like this code snippet:
Code:
<material name="highway_tube" shader="shaderfx\high\XU_highway_tube.fx" blendmode="additive" preview="none">
<properties>
.....
<property type="Color" name="color_tint" r="180" g="200" b="120" a="255" value="(color 180 200 120)"></property>
......
</properties>
<variations></variations>
</material>
In this case, all I want to do is change the color-tint property of an existing material definition. If I wanted to create a new material, I could simple add a single new entry in my mod version of this file, and the game would find it appended at the end of the material_libary.xml definitions.
However, since I don't want to add or merge a new entry, I will use the "patch" method to modify the existing definition as follows (refer to XML Patch standard RFC 5261 to understand how this is done):
Code:
<diff>
<!-- Changes Tube Color from yellow to blue -->
<replace sel="/materiallibrary/collection[@name='effects']/material[@name='highway_tube']/properties/property[@name='color_tint']">
<property type="Color" name="color_tint" r="120" g="124" b="200" a="255" value="(color 33 13 98)"></property>
</replace>
</diff>
This new version of material_libary.xml differs from the standard file as follows:
a). Notice the <diff> root node. This instructs the game that I am applying some "difference" to the existing core definitions. Using <replace sel> we search for the values we are changing. In this case, we are changing the color_tint for this effect.
b). Our patch file contains ONLY the changes we are making . It does NOT include all the other entries (if it did, the game would get confused because of double entries).
Note: The original core game files should never be changed. All you are doing is creating modified versions and putting them in your extension folder/s.
The following image shows how this change looks in the game:
Example 3: Create a custom billboard advertisement
Let us see what is involved in replacing one of the existing billboard ads.
First, it is a good idea to extract the existing game textures associated with ads. This way, we can see which image we need to replace. Note: you will need to have the extracted game files available (XRCatTool.exe).
1. Identify one of the existing billboards that you want to replace.
2. Locate folder \assets\fx\textures\ads\ads
3. Extract all the .gz files into some directory for viewing
4. Using a command prompt, navigate to the extraction directory
5. Type the following command: rename *.* *.dds. This will give all the files their dds image extension (for that is what they are).
6. Using your dds capable image editor, locate and open the image that corresponds to the billboard ad you want to replace.
8. Create and save a new .dds image that exactly matches the size, channels, etc of the one you are replacing. In my example, I have named this image as: ads_osr_01.dds
9. Remove the .dds extension from your new image. Note: This isn't necessary, but I'm doing it to match the results of the extraction tool.
10. Using 7-Zip (or equivalent), create an archive with .gz extension containing your new image. Name this archive: ads_osr_01.gz. ] This file is located in \extensions\osr_reborn\assets\fx\textures\ads
11. Open the provided example file libraries\material_library.xml and notice the following:
Code:
<!-- Replace ads-plamacells with Observe Space Research advertisement -->
<replace sel="/materiallibrary/collection[@name='ads']/material[@name='ads_plasmacells']/properties/property[@name='diffuse_map']">
<property type="BitMap" name="diffuse_map" value="extensions\osr_universe\assets\fx\textures\ads\ads_osr_01"></property>
</replace>
Here I am replacing the normal definition for the plasma cell advertisement with one of my own specifying my custom image.
Note: If you don't want to replace all instances of the standard billboard image, you would need to create a custom billboard mesh (or modify the material reference in an existing mesh) and change the macro reference to use your mesh instead of the normal one. This technique will be used in a subsequent example.
Example custom billboard:


")
")
")
")
")
")
")
")
")
")
")
")
")
")
")
")
")


")
")


")
")
")